 Downsizing SATA drives
Introduction
This article will describe how to use the STB Suite to change the capacity that a SATA drive reports having.
There are a number of reasons you may wish to do this, for instance when designing a DMM Test Sequence which has steps that write, read, or verify the entire drive you can temporarily set the size of the drive to an artificially small size so that the test steps will complete faster.
Or you may have a system or application which requires a disk drive to be a certain size.
Or you may have a system using SSDs (Solid State Drive) which requires the highest available write speeds over a long period of time. Setting the reported capacity down to a smaller size can alleviate the problem of Write Amplification by letting the drive keep more of it’s capacity free as erased blocks.
Terminology
We will use the terms capacity and size interchangeably, meaning the capacity which the drive reports as available or user accessible blocks. SATA drives report this capacity as a field in the SATA IDENTIFY data.
User Accessible Sectors
This is reported in the field Number of User Accessible Sectors, specifically the Number of User Accessible Sectors – 48-bit Addressing.
Native Maximum
The drive can also report what its native maximum Highest LBA (Logical Block Address) is via the DCO Identify data.
Maximum LBA vs Highest Number of Sectors
The difference between what the drive reports as the Maximum LBA and what the drive reports as the Number of available sectors can be confusing.
Because the blocks on a disk drive are numbered as zero-based numbers the Highest LBA will always be one less than the Number of Sectors.
For example, we have a disk which reports the Number of Sectors = 10. The Highest LBA will be 9, because the drives LBA’s are numbered 0,1,2,3,4,5,6,7,8,9. Ten total blocks numbered from 0 through 9.
Requirements
The only requirement for changing SATA drive capacity is that you have your SATA drive(s) connected to a SAT-compatible SAS Host Bus Adapter in your test system.
Changing Capacity
To change the reported capacity of a SATA drive start the STB Suite in Original Mode and go to the top menu item ATA/SATA->Commands->Change Drive Capacity.
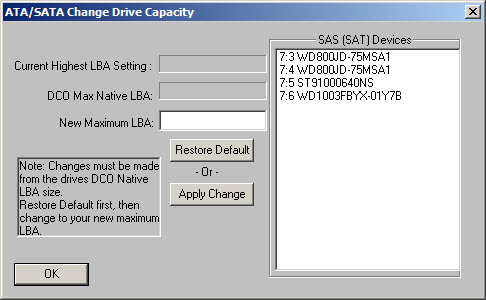
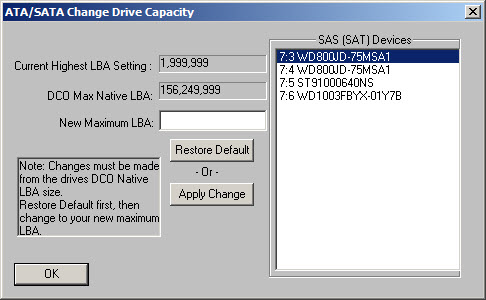
Select the drive you wish to change by clicking on it in the list of drives. The Current Capacity of the drive will be shown along with the Native Maximum LBA

In this example we have a drive that is currently set up with all of its Native Capacity available as user accessible LBAs. We are going to “short-stroke” this drive down to a smaller size by entering the new Maximum LBA we want the drive to report.
Remember the zero-based discussion above? By setting the New Maximum LBA to 1,999,999 we are changing the drive to now report that it is 2,000,000 blocks in size ( blocks 0 through 1,999,999).
Clicking the Apply Change button … applies the change which is now shown in the Current Highest LBA field
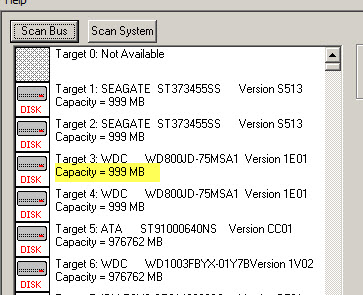
Looking at the STB Suite device display shows that the drive is now a 999MB drive
Restoring the Native Settings
To change the drive back to its native setting for the Maximum number of LBAs simply select the drive from the devices list and then click the Restore Default button. The new capacity is now reported

Order of Changes
In the Note field you will see the message stating that changes to the drives capacity must always be made from the Native Default size. This means that if you wanted to change the drives capacity twice you would make the first change, then you must restore the drives default, then you can make the second change.
This would happen if you made a mistake in the first change and needed to make another change. Just remember – always change From the drives Default Maximum LBA setting.
Seeing Changes reported
You may notice that after you have changed the capacity of a drive that the new capacity is not reported correctly in the STB Suite device menu. This is because the capacity changes may not be reported correctly until the drive has been reset.
Resetting the drive can be as simple as clicking on the Scan Bus button. However, if you click Scan Bus and the cursor changes to an hourglass and then immediately changes back the reset has not really “taken”. To deal with this situation there are a few things you can try in order of simplicity:
- Click Scan Bus several times, until the cursor stays in hourglass mode for several seconds before changing back
- Use the STB Suite Bus Reset Tool to force a reset on the controller your drive is connected to. Go to the top menu Bus Resets choice to start the Bus Reset Tool
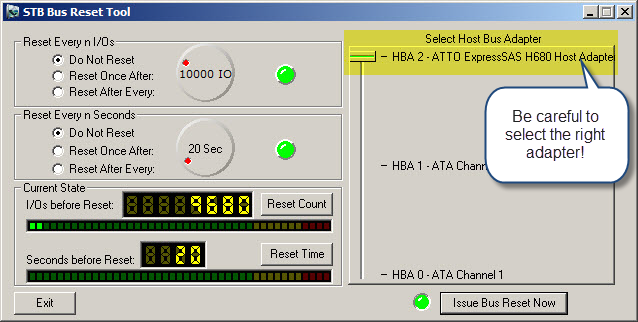 Be absolutely certain that you have set the slider control to select the proper Host Bus Adapter. Issuing a bus reset to your main system HBA can cause problems!Select the proper HBA with the slider control and then click the Issue Bus Reset Now button. Now check if the drive is reporting the new capacity.
 - Use the Windows Device Manager ->Scan for Hardware Changes to try to force a reset
- For the most stubborn drives you may need to power the drive down and then back on to force the drive to reset and report its new capacity.