Overview
The STB Suite Original mode has several versatile buffer functions for capturing, editing, storing, and overall using binary data. All of these functions are accessed by going to the STB Suite top menu Buffer choice:
In this paper we will cover basic things such as getting data into the buffer, editing buffer data, and a few File Operations which are used to make life simpler by allowing you to save buffer data to files and load the buffer from files.
We will also discuss the functions to directly load the buffer from the currently selected disk drive and to write buffer data to disk blocks.
Note: the STB Suite buffer is split into two equal sized sections – in this tutorial we will use Buffer 1 which is the default.
Reading into the Buffer
Almost all commands and tests in the STB Suite will use the Buffer, which can then be used to edit, modify, store to a file – manipulate the data in many ways.
The first way of getting data into the buffer is automatic – almost every command, test, or other operation within the STB Suite will use the buffer to store data.
Think of the Buffer Function as a window to look into this data. For example, right-click on one of your disk drives and choose INQUIRY from the Quick Commands menu. You will see a pop-up box showing the data returned from the drive. Now click on the Buffers menu choice and you will see the same data accessible for editing, saving to a file, etc.
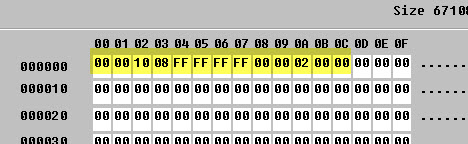
Display Format
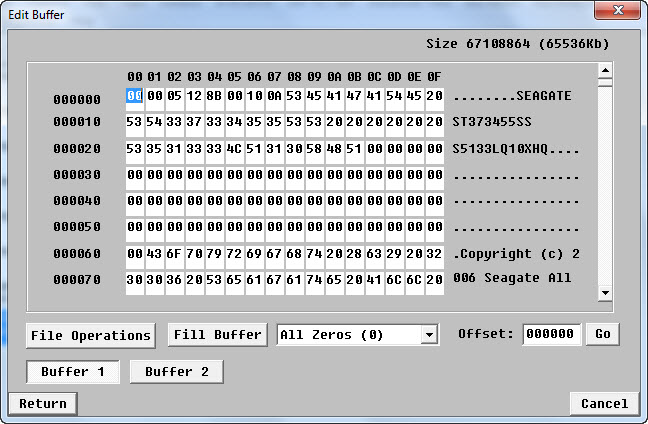
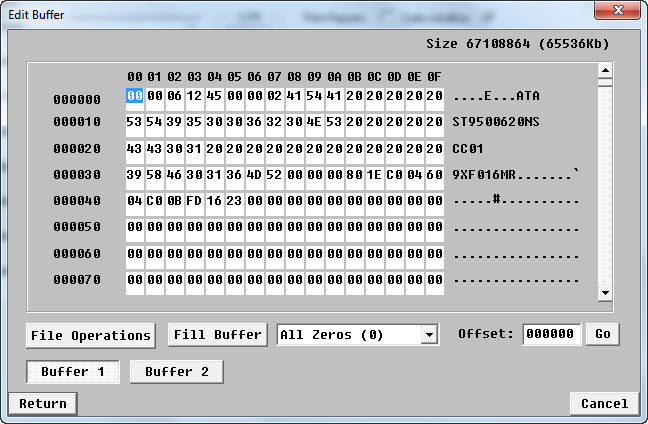
The data is shown in hexadecimal, along with address indexes to help you locate any particular byte. To the right of the hex display is an ASCII display. If a given hex number is in the set of printable ASCII characters then the character will be shown here. If the hex value does is not in the set of printable ASCII characters then a dot (.) will be printed.
Also note that the size of the buffer is shown in the top right corner.
Clearing or setting the Buffer
Select All Zeros from the Data Pattern pulldown, then click the Fill Buffer button to fill the buffer with this pattern. Likewise you could choose Random data pattern and fill the buffer with that, etc.
Editing the Buffer
Once you are in the main Buffer function you can move to any byte and enter any hex value. If you need to move the buffer to a location that isn’t currently displayed on the screen you can either scroll up and down using the scroll bar at the right of the data display, or you can enter an offset into the Offset field then click Go to move the buffer to display that address.
Note: if you do change any byte in the buffer, when you go to exit the Buffer function by clicking Return you will see a warning box stating “Save Changes?”. Clicking Yes will keep any changes you made, clicking NO will discard all changes.
Buffer File Functions
Saving the buffer to a file
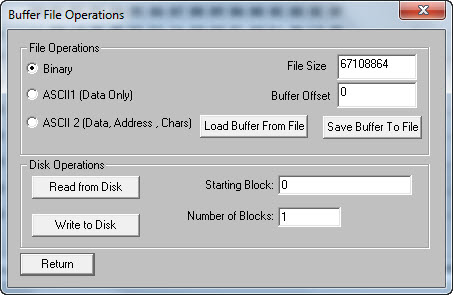
Click on the File Operations button on the main Buffer screen
File Data Format
Choose the format that you want the data to be written to the file by picking one of the three buttons, Binary, ASCII 2 (Data Only), or ASCII 2 (Data, Address, Chars).
Binary
The Binary data format will write the “raw” binary data to the file you create. Each byte of buffer data will be written exactly as-is to the file. You wouldn’t be able to “Type” this format as it is raw hex data.
ASCII 1 (Data Only)
This format will write ASCII hex printable data to the file – “typing” a file made this way will show this:
 00 00 05 12 8B 00 10 0A 53 45 41 47 41 54 45 20
 53 54 33 37 33 34 35 35 53 53 20 20 20 20 20 20
ASCII 2 (Data,Address, Chars)
This format will write ASCII hex printable info – including the address indexes. Typing this file would show:
000000 00 00 05 12 8B 00 10 0A 53 45 41 47 41 54 45 20     ........SEAGATE
  000010 53 54 33 37 33 34 35 35 53 53 20 20 20 20 20 20     ST373455SS
NOTE: Very Important!!! –
the Buffer File Operations Save Buffer to File function will write as many bytes as is indicated in the File Size window. This value defaults to the entire buffer – note in the example above that this is 67,108,864 bytes – about 66MB!
You will always want to change this value to a more reasonable number!
In the example above I set this value to 32 bytes.
In addition to the File Size setting you may also specify a starting byte offset into the file, entering your offset in the Buffer Offset field. This will start storing data to your file starting at the offset specified here.
Once you have chosen your file data format and specified the appropriate number of bytes to store in the file (File Size) you then click the Save Buffer To File button to create the file.
Loading the buffer from a file
It is our experience that in 99% of the times we go to load the buffer from a file we are loading in the Binary format. However if you have previously saved to a file using either of the other two ASCII formats you can reload the buffer by selecting the appropriate format.
NOTE: Very Important!!! –
the Buffer File Operations Load Buffer from File function will try to read as many bytes as is indicated in the File Size window. Set this value to the actual file size or a reasonable value close to the file size to avoid problems.
Once you have loaded the Buffer from a file you are free to edit the buffer data or use the buffer data in a CDB which has a DATA OUT phase.
Example Using the Buffer for a CDB with DATA OUT phase
For this example we are going to use the Buffer Functions to create a set of bytes to be used with a MODE SELECT CDB to restore the full factory default capacity of a SCSI/SAS/FC disk drive. Assuming that you had previously short-stroked the drive.
You could do the following Buffer edit and save steps from the STB Suite original mode main-menu Buffer function choice – but since we are going to use this buffer data in conjunction with a User Defined CDB we will use the handy feature of accessing the buffer functions from the User Defined CDB menu.
Right-click on your SAS/SCSI/FC disk and choose User Defined CDB’s from the Quick Command menu.
Define your MODE SELECT CDB exactly like this:
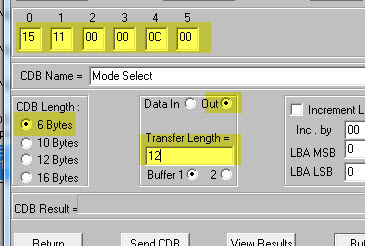
Now click on the Buffers button and enter the following values into the first 12 bytes of the buffer –
NOTE: This is MODE PAGE Header and Block Descriptor data, telling the drive to return to its full factory default capacity of 512-byte blocks. Study your SCSI command documentation concerning MODE SENSE and MODE SELECT commands to understand why this data is chosen.
NOTE: If you had previously entered this data into the buffer and saved it as Binary data you could have just used the Load Buffer from File function to load the proper 12 bytes into the buffer.
For educational purposes at this point I’d recommend that you start up BAM (the Bus Analyzer Module), select your drive, and begin a trace.
After you’ve sent the CDB you can stop the BAM trace and view exactly what happened as you sent this CDB.
BAM is an excellent tool to observe things like this.
To send the CDB – click the Send CDB button. Hopefully you will see a status indicating that the command succeeded, and once you’ve reset the drive you should now see it’s full factory default capacity.
Reading from and Writing to disk blocks using the Buffer functions
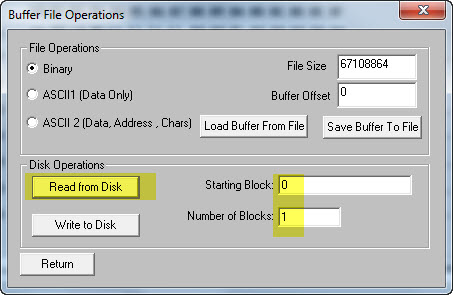
Reading one or more blocks from a disk
The Buffer->File Operations->Read from Disk function lets you load the buffer with data from one or more blocks from your currently selected disk. This can be useful as a quick way to confirm that the data pattern you thought you wrote during a test was actually written. It can also be used for analyzing disk file system structures and otherwise bringing data in off of a disk and saving it to a file, etc.
Writing one or more blocks to a disk
Conversely you can quickly and easily write whatever data is in your buffer out to any block(s) on your currently selected disk.
Summary
The STB Suite Buffer function is extremely powerful and versatile. It allows you to manipulate any type of data whether read in from a file, read from a disk block, or entered via the Hex Editor. There are powerful functions to load common data patterns, and many functions to work with files.